Composting Toilets Vs Septic Systems For The Off-Grid Win: Which Will Take The Gold?
- Composting toilets save approximately 6,000 gallons of water per person annually, making them ideal for water-scarce or off-grid locations with limited resources.
- Septic systems provide conventional plumbing convenience but require suitable soil conditions, professional installation, and significant land area for drain fields.
- Composting toilets transform human waste into valuable nutrient-rich compost that improves soil health, creating a closed-loop system perfect for sustainable homesteads.
- While composting toilets have a lower initial cost ($800-$3,000) compared to septic systems ($3,000-$10,000+), they require more hands-on maintenance.
- Local regulations vary widely - some areas accept composting toilets while others require conventional septic systems regardless of your preferences.
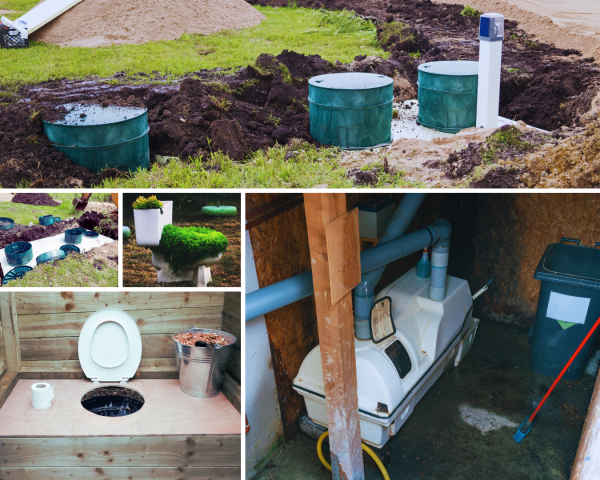
Creating your dream off-grid homestead means making critical decisions about systems that will impact your daily life for years to come. Few choices are more fundamental than how you'll handle waste management. Composting toilets and septic systems represent two distinctly different approaches to sustainable living.
I can tell you this: each option has compelling advantages that might make it the perfect solution for your unique situation. The right choice depends on your water availability, property characteristics, maintenance preferences, and sustainability goals.
Let's examine how these systems actually work, starting with the increasingly popular composting toilet option that's changing how sustainable homestead enthusiasts approach waste management in off-grid settings.
How Composting Toilets Work
1. Biological Breakdown: Turning Waste Into Compost
Composting toilets use the natural process of aerobic decomposition to transform human waste into usable compost. Unlike septic systems that treat waste as something to dispose of, composting toilets view it as a resource to recycle.
The process begins when waste enters the composting chamber. Each time you use the toilet, you add carbon-rich material like sawdust, coconut coir, peat moss, or dried leaves on top of the waste. This bulking agent serves multiple crucial purposes:
- Creates air pockets to maintain aerobic conditions
- Absorbs moisture to achieve the ideal dampness
- Provides carbon to balance the nitrogen-rich human waste
- Minimizes odors by covering fresh waste
Within the chamber, naturally occurring bacteria, fungi, and microorganisms break down the waste materials. Over time, these decomposers transform proteins, fats, and carbohydrates in human waste into simpler compounds. The end result is a soil-like substance rich in nitrogen, phosphorus, and potassium – the same key nutrients found in commercial fertilizers.
2. Moisture Management: Balancing Liquids and Solids
Effective moisture control is critical to successful composting. The composting medium should be damp like a wrung-out sponge – not soggy and not dried out. Too much moisture creates anaerobic conditions that slow decomposition and create odors, while too little moisture prevents microbial activity.
Different composting toilet designs handle moisture in various ways:
- Urine-diverting designs: Separate liquid and solid waste at the source to prevent excess moisture in the composting chamber. The diverted urine can be diluted and used as fertilizer or processed separately.
- Evaporation systems: Use ventilation fans and sometimes heating elements to evaporate excess moisture, releasing it through a vent pipe.
- Leachate collection: Some systems collect excess liquid (leachate) in a separate container for proper disposal or additional treatment.
The right moisture balance ensures efficient decomposition while preventing unpleasant odors that can occur when systems become too wet.
3. Ventilation and Odor Control: Keeping Things Fresh
Contrary to what you might expect, a properly functioning composting toilet shouldn't smell bad. Effective ventilation is the key to odor-free operation. Most systems incorporate these ventilation elements:
- A vent pipe that extends outside the building (usually through the roof)
- A small electric fan that creates negative pressure, drawing air down through the toilet and out the vent
- Careful sealing around the toilet components to ensure air flows in the right direction
This continuous airflow serves several purposes. It carries away moisture through evaporation, provides oxygen to aerobic bacteria, and ensures any potential odors are vented outside rather than into your living space. The small fans typically use minimal electricity (often just 2-4 watts), making them perfect for solar-powered homes.
Some high-end models incorporate carbon filters or other odor-neutralizing technologies as an extra precaution, but most users find simple airflow sufficient when the system is properly maintained.
4. Compost Cycle and Removal: From Collection to Curing
Unlike a septic system where waste disappears underground, composting toilets require you to periodically remove the end product. The timing and process vary by system type:
- Self-contained units typically need emptying every 2-4 months for a couple using the toilet full-time
- Central systems with larger capacity might only need emptying once or twice a year
- Batch systems require swapping containers when full (weekly to monthly depending on use)
When you remove compost from most systems, it's not yet fully cured. The material should be moved to a secondary composting location (often a dedicated outdoor compost bin) and allowed to age for at least one year before use. This additional time ensures complete decomposition and elimination of potential pathogens.
The final product is a dark, soil-like material that can be used around ornamental plants, trees, or shrubs. Most authorities recommend against using it on food crops, though some experienced composters do use it on fruit trees or other crops where the compost doesn't contact edible portions.
Types of Composting Toilets
1. Self-Contained Units: Compact and Portable
Self-contained composting toilets house the entire composting system within a single unit that sits in your bathroom. These all-in-one designs are popular for tiny homes, cabins, and situations where simplicity and minimal installation are priorities.
Popular models like the Nature's Head and Separett Villa have gained widespread adoption among off-grid enthusiasts. These units typically feature:
- A toilet seat and bowl connected directly to a composting chamber below
- Urine diversion to separate liquids from solids
- A small ventilation fan and vent hose
- A handle or crank to mix the composting materials
- Removable containers for both compost and urine
Advantages include easy installation (just secure to the floor and run the vent), portability (can move with you), and no need for plumbing connections. The main limitation is capacity – because the composting chamber is relatively small, these units require more frequent emptying than larger systems.
2. Split/Central Composting Systems: Higher Capacity, Less Frequent Maintenance
Split or central composting systems separate the toilet fixture from the composting chamber. Typically, the toilet sits on the main floor while the larger composting unit is located below – in a basement, crawlspace, or purpose-built enclosure.
These systems connect via a straight drop chute and offer significant advantages for full-time residences:
- Much larger composting capacity, often holding a year's worth of waste for a family
- Less frequent maintenance and emptying requirements
- Ability to connect multiple toilets to a single composter
- More stable composting conditions due to larger thermal mass
EcoLet, Phoenix, and Sun-Mar offer well-regarded central systems. Installation is more complex than self-contained units, requiring coordination between floor levels and potentially some structural modifications. However, the reduced maintenance frequency makes these systems appealing for permanent homes.
3. Bucket/Batch Systems: Simplest DIY Option
For the budget-conscious homesteader or those who enjoy simple, DIY solutions, the humble bucket system (sometimes called a "humanure" toilet) represents the most accessible composting toilet option.
These systems consist of:
- A 5-gallon bucket with toilet seat lid
- A supply of cover material (sawdust, wood shavings, or coconut coir)
- A dedicated outdoor composting area for emptying and processing waste
After each use, you simply cover the waste with organic material. When the bucket gets about ⅔ full, you empty it into a designated composting bin outside, clean the bucket, and start again. While extremely low-tech, this approach has been successfully used by thousands of homesteaders worldwide.
4. Vermicomposting Toilets: Worms at Work
Vermicomposting toilets incorporate red wiggler worms to accelerate the decomposition process. These specialized worms consume organic matter and excrete castings that are exceptionally rich in plant nutrients.
The worms create tunnels that aerate the compost pile, eliminating the need for manual turning in many systems. Their digestive systems also destroy pathogens and convert nutrients into forms more readily available to plants. A well-maintained vermicomposting toilet can process waste faster than standard composting systems and produces a particularly valuable end product.
How Septic Systems Work
1. The Flow Path: From Flush to Tank
Unlike composting toilets, septic systems are essentially miniature wastewater treatment plants buried on your property. The journey begins when you flush a conventional toilet or drain water from sinks, showers, and appliances.
All this wastewater flows through pipes into the septic tank, which is typically:
- A large container made of concrete, fiberglass, or polyethylene
- Buried underground near your home
- Sized according to your home's expected wastewater flow (usually 1,000-2,000 gallons)
- Completely watertight to prevent leakage
The septic tank acts as the first stage of treatment, where physical separation begins the process of breaking down waste. Unlike composting toilets, septic systems rely primarily on anaerobic (without oxygen) decomposition inside the tank.
2. Settling and Separation: What Happens Inside the Tank
Inside the septic tank, wastewater separates into three distinct layers:
- Scum layer: Fats, oils, and lighter materials float to the top
- Effluent layer: Relatively clear liquid in the middle
- Sludge layer: Heavier solids sink to the bottom
Baffles or tees at the tank's inlet and outlet prevent the scum and sludge from flowing out while allowing the clarified effluent to exit. Anaerobic bacteria work continuously to break down organic matter in the tank, but the process is slower than aerobic composting.
Over time, non-biodegradable solids and the byproducts of bacterial digestion accumulate in the tank as sludge. This is why tanks need periodic pumping—typically every 3-7 years depending on usage and tank size.
3. Effluent Treatment: Soil as the Final Filter
The most critical yet invisible part of a septic system is the drain field (also called a leach field or absorption field). This is where the real treatment happens:
- Effluent from the septic tank flows into a series of perforated pipes laid in gravel-filled trenches
- Liquid slowly seeps out of the pipes into the surrounding soil
- Natural filtration occurs as the effluent passes through soil particles
- Soil bacteria continue breaking down nutrients and organic matter
- Pathogens are removed through biological processes, predation, and filtering
A properly functioning drain field is a remarkable natural treatment system. As wastewater percolates through the soil, physical, chemical, and biological processes remove pathogens, nutrients, and other contaminants. However, this system depends entirely on having suitable soil conditions.
The drain field must be sized appropriately based on your soil's percolation rate (how quickly water moves through it). Poor or slowly draining soils require larger drain fields, while excessively fast-draining soils might not provide adequate treatment before the effluent reaches groundwater.
4. System Balance and Maintenance: Keeping the Cycle Functioning
Unlike composting toilets, where you actively manage the composting process, septic systems operate largely out of sight. However, they require careful use habits to maintain the biological balance:
- Avoid flushing non-biodegradable items or harsh chemicals that can kill beneficial bacteria
- Spread out water usage to prevent overloading the system (don't do all your laundry in one day)
- Keep heavy vehicles and deep-rooted plants away from the drain field
- Have the tank pumped regularly to remove accumulated solids
This last point is critical – if solids aren't removed periodically, they can flow into and clog the drain field, potentially causing a complete system failure that's expensive to repair.
Types of Septic Systems for Different Soil Conditions
1. Conventional Gravity Systems
The standard septic system described above relies on gravity to move effluent from the tank to the drain field. These systems are:
- Simplest in design
- Least expensive to install
- Most energy-efficient (no pumps or moving parts)
- Suitable for sites with good soil percolation and where the drain field can be placed downhill from the tank
However, conventional systems are not one-size-fits-all. They work best in well-draining soils with adequate depth to groundwater or bedrock.
2. Pressure Distribution Systems
When site conditions aren't ideal for a gravity system, pressure distribution offers an alternative. These systems add a pump chamber after the septic tank, which periodically doses the drain field with effluent under pressure. This approach:
- Distributes effluent more evenly throughout the drain field
- Works when the drain field is uphill from the house
- Functions better in somewhat marginal soils
- Requires electricity to operate the pump
The added complexity means higher installation costs and the potential for pump failures, but these systems perform better in challenging conditions.
3. Mound Systems for Poor Drainage
When native soils are too dense, shallow, or wet, a mound system creates an artificial drain field above ground. These systems:
- Build up layers of sand and gravel above the natural soil
- Use pressure distribution to push effluent up into the mound
- Create adequate separation from groundwater or restrictive layers
- Require significant space and careful engineering
Mound systems are considerably more expensive than conventional septic systems but allow development of sites that otherwise couldn't support a septic system.
4. Aerobic Treatment Units
For the highest level of treatment before discharge, aerobic treatment units (ATUs) introduce oxygen into the treatment process. These advanced systems:
- Add an aeration chamber where air is bubbled through the wastewater
- Support aerobic bacteria that decompose waste more quickly and completely than anaerobic bacteria
- Produce higher-quality effluent that requires less soil treatment
- Often include disinfection components like UV light or chlorination
ATUs are the most complex and expensive septic option, requiring electricity and regular professional maintenance. However, they allow for smaller drain fields and can work in locations where other systems cannot.
5. Matching Waste Systems to Soil Types: What Works Where
The relationship between your soil and waste system is critical. Here's a simplified guide:
- Sandy soils: Drain quickly but provide less filtration. Conventional systems work but may need larger separation from groundwater.
- Loamy soils: The ideal balance of drainage and filtration. Most system types work well.
- Clay soils: Drain poorly and may require pressure distribution, mounds, or ATUs.
- Shallow soils over bedrock or high water table: Require mound systems or ATUs to provide adequate treatment depth.
- Steep slopes: May need specialized drain field designs or terracing.
Composting toilets, by contrast, are largely unaffected by soil conditions since they don't discharge effluent into the ground. This makes them particularly valuable for challenging sites where septic installation would be difficult or impossible.
Installation Requirements and DIY Feasibility
1. Skills, Tools & Knowledge Required To DIY a Composting System
The advantage of composting toilet systems is that many can be installed by moderately handy homeowners. Here's what you need for each type:
Self-Contained Units
- Basic carpentry skills to secure the unit to the floor
- Ability to drill a 2-3" hole through an exterior wall or roof for the vent pipe
- Basic electrical knowledge for connecting the small ventilation fan
- Tools: Drill, hole saw, screwdrivers, level
Split/Central Systems
- More advanced carpentry to create the chute opening between floors
- Ability to build an enclosure for the composter in the lower level
- Ventilation installation similar to self-contained units, but possibly longer runs
- Tools: Circular saw, reciprocating saw, carpentry tools
Most composting toilet installations can be completed in a weekend, with costs primarily limited to the unit itself and minor materials like vent pipe and fittings.
2. Permits, Certifications & Regulations Affecting Composting Systems
Regulatory hurdles for composting toilets vary widely depending on location:
- Some progressive areas explicitly allow composting toilets in their building codes
- Other jurisdictions may have no specific provisions for composting toilets
- Some places technically require a septic system or sewer connection regardless of whether you plan to use a composting toilet
To navigate these waters:
- Research local health department regulations before purchasing
- Consider NSF/ANSI Standard 41 certified units, which are more likely to be permitted
- Prepare to educate officials who may be unfamiliar with modern composting systems
Many off-grid enthusiasts report that rural areas often have less scrutiny of alternative systems, especially for outbuildings or secondary structures.
3. Septic System Installation: Professional Territory
Unlike composting toilets, DIY septic installation is problematic for several reasons:
- Many jurisdictions legally require licensed professionals to install septic systems
- The engineering requirements are complex and mistakes can be environmentally hazardous
- Heavy equipment (excavator, backhoe) is necessary for digging tank holes and trenches
- Improper installation can lead to system failure, property damage, and health hazards
A typical professional septic installation involves:
- Site evaluation and soil testing ($300-$600)
- System design by an engineer ($1,000-$2,000)
- Permitting ($200-$1,000 depending on location)
- Excavation and tank installation ($1,500-$4,000)
- Drain field construction ($2,000-$6,000)
- Final inspection and approval
The total professional installation cost typically ranges from $3,000 for a simple system in ideal conditions to $20,000+ for complex engineered systems in challenging locations.
Cost Comparison: Initial Investment vs. Long-Term Expenses
1. Composting Toilet Pros: $800-$3,000 Initial Cost, Minimal Ongoing Expenses
The financial case for composting toilets is compelling:
- Commercial self-contained units typically cost $800-$1,500
- Central/split systems range from $1,500-$3,000
- DIY bucket systems can be built for under $100
- No water costs for flushing
- No electricity costs except minimal fan power
- No professional pumping services needed
- Maintenance costs limited to occasional fan replacement or minor repairs
When you factor in the water savings (potentially thousands of gallons annually), the long-term economics strongly favor composting systems.
2. Composting Toilet Cons: It’s a New Way, & New Things Can Take Getting Used To
Switching to a composting toilet can feel like stepping into a different mindset—and for some, that’s the hardest part. If you’ve spent your entire life flushing and forgetting, composting may seem… well, weird at first.
There’s no running water, no familiar swirl of the bowl, and yes, you’ll be a bit more hands-on with your waste (especially if you're using a bucket or batch system). That can trigger an initial “ick” factor for newcomers. Even with sleek self-contained units, there’s still regular emptying, occasional compost mixing, and some light cleaning to keep everything running smoothly.
Additionally, guests unfamiliar with composting toilets may need a crash course to avoid user error (read: forgetting the bulking material or tossing in the wrong things). And while smell isn’t typically an issue in a well-maintained system, the fear of odor can be a deal-breaker for the uninitiated.
Still, most off-gridders report that the learning curve is short, and once you're used to the rhythm, the system becomes second nature. But let’s be clear: this isn't a "set it and forget it" approach. It’s a relationship with your waste system—and like any good relationship, it takes a little communication and commitment.
3. Septic System Cons: $3,000-$10,000+ Installation, Periodic Pumping Costs
The financial picture for septic systems includes:
- Conventional system installation: $3,000-$7,000 depending on site conditions
- Alternative systems (mounds, ATUs): $10,000-$20,000+
- Pumping costs: $200-$500 every 3-7 years
- Potential repair costs if components fail
- Water usage for flushing
- Possible electricity costs for pumps or aerators in advanced systems
- Major replacement costs if drain fields fail (potentially thousands of dollars)
The initial installation represents a significant investment, and the long-term costs continue throughout the system's life.
4. Septic System Pros: Familiarity, It’s the Way You’ve Always Done It
Let’s face it—septic systems win the comfort contest hands down. They feel just like what most people grew up with. You flush. It goes away. You don’t think about it again for years, unless something goes wrong.
That familiarity brings peace of mind, especially for families making the leap to off-grid living who don’t want to explain a new toilet routine to every house guest or skeptical relative. With a septic system, there’s no need to educate anyone about sawdust scoops, ventilation fans, or compost curing bins.
They also integrate seamlessly with standard plumbing fixtures. That means no sacrifices in design, no specialized equipment in your bathroom, and no modifications needed for things like bidets or high-flow toilets. If you’re installing a full bathroom suite or have a multi-bathroom household, septic can often handle it all—flushes, showers, laundry, dishwashers—without any special workflow.
And for those planning to sell a property someday, septic systems tend to raise fewer eyebrows during inspections or appraisals. They’re legally recognized, code-approved in nearly every jurisdiction, and backed by an entire industry of professionals ready to install and maintain them.
So while they’re more expensive and dependent on site conditions, septic systems remain the default choice for a reason: they offer plug-and-play convenience, social acceptability, and a long track record of doing the job—without asking anyone to change their habits.
Space Requirements: Indoor and Outdoor Considerations
Waste systems don’t just take up mental space—they need real square footage too. Whether you’re designing a cozy tiny home, a large family homestead, or a weekend cabin in the woods, understanding the spatial footprint of each waste solution is critical for smart design. Let’s break it down by system type and location.
1. Composting System Space Requirements – Indoor: By Type
Self-Contained Units:
These are the most compact options available, often taking up no more space than a standard toilet. Models like the Nature’s Head or Separett Villa typically measure around 20–24 inches wide, 19–22 inches deep, and 21–26 inches high. They don’t require plumbing, but they do need:
-
Room for the rear ventilation pipe (typically 2–3 inches in diameter)
-
Clearance to operate a crank or mixing handle
-
Wall access or roof access for venting
-
A nearby power source (for fan models)
Because of their tidy footprint, these units are ideal for small homes, RVs, boats, and van conversions—anywhere you’re counting inches.
Split or Central Systems:
These require more creative planning. The toilet itself looks similar to a conventional model and sits on the main floor, but the composting chamber is located on a lower level—typically directly beneath it. That means:
-
A straight drop chute (sometimes up to 10 inches in diameter)
-
Clearance beneath the floor for a composting bin, often 2–4 feet tall and 2–5 feet wide
-
Access space for removing finished compost
-
Additional room for ventilation piping
These systems are better suited to homes with basements, raised foundations, or purpose-built compost chambers. They’re excellent for larger families or year-round use but demand more upfront design consideration.
Bucket & Batch Systems:
Minimalist and flexible, bucket systems need just enough room to sit a 5-gallon bucket, a seat, and a container of cover material nearby. The key here is convenience and ease of cleaning, not aesthetics. They’re often placed in outhouses, shower stalls, or corners of utility rooms.
Keep in mind:
-
They require accessible paths to the outdoor compost pile
-
You’ll want a space that’s easy to sanitize
-
Most folks pair them with odor barriers like lids or urine diverters
Vermicomposting Toilets:
Worm-based systems vary in size but often require more under-toilet space for worm bins and drainage trays. The toilet bowl may appear standard, but underneath it’s a thriving worm farm. These systems work best with:
-
Crawlspaces, basements, or raised floors
-
Extra vertical clearance for stacking layers of composting trays
-
Warm, insulated areas—worms don’t like the cold!
2. Composting System Space Requirements – Outdoor: By Type
While composting toilets minimize indoor infrastructure, they usually require some kind of outdoor footprint—especially when it comes to compost curing, leachate handling, or expanded system capacity. Here’s how that plays out across the various types:
Self-Contained Units:
Most self-contained composting toilets don’t need any outdoor components beyond a vent pipe. However, once the chamber fills up, the semi-finished compost typically needs to be transferred to a secondary composting bin outdoors for proper curing.
You’ll want:
-
A designated composting area—ideally 3–5 feet wide and 2–3 feet deep
-
A bin that can hold 1–2 cubic feet of material per person per year
-
A way to keep the pile protected from rain and pests (roofed bin, enclosed tumbler, or heavy lid)
-
At least one year of curing space for rotational batches
For rural homesteads, this often becomes part of the larger compost system, alongside kitchen scraps and garden waste.
Split/Central Systems:
These systems sometimes allow full decomposition inside the large composting unit, but even then, many users still cure the finished product in an outdoor bin for safety and consistency. Depending on usage volume, that may mean:
-
Multiple curing bins or rotating compost bays
-
A protected and ventilated space at least 4–6 feet wide
-
Drainage control if any leachate is produced
In addition, some split systems with urine diversion may route liquids to an external container or infiltration bed—so plan for piping and a frost-safe storage tank if needed.
Bucket & Batch Systems:
This is where outdoor space really matters. With each full bucket emptied into an external compost pile or bin, your outdoor setup becomes the primary site for decomposition.
You’ll need:
-
A secure, ventilated composting bin—ideally two or more for batch cycling
-
20–40 square feet of dedicated composting space for a family of four
-
Access paths for carrying and cleaning buckets
-
Fencing or deterrents to keep curious critters out
Some homesteaders even construct dedicated “humanure haciendas” with roofed bins, straw bedding, and weatherproof lids to maintain good aesthetics and protect the pile from seasonal conditions.
Vermicomposting Toilets:
These are typically self-contained but still may produce small amounts of liquid waste (leachate or urine) that require outdoor handling. You might need:
-
A subsurface infiltration bed or mulch basin
-
Small sealed leachate tanks or passive wicking beds
-
Outdoor access for harvesting worm castings
If you’re using worms in an outdoor composting setup (rather than under a raised toilet indoors), remember that temperature regulation is key—extreme cold can wipe out your worm population in a flash.
3. Septic System Space Requirements – Indoor: By Type
While most of a septic system lives underground outdoors, there are still a few important indoor considerations—especially if you're building from scratch or retrofitting a homestead for off-grid use.
Standard Plumbing Fixtures:
The beauty of a septic system is that you can design your interior just like a grid-tied home. Toilets, sinks, tubs, dishwashers—everything connects through standard plumbing into the wastewater drain system. You’ll need:
-
Sufficient space for full bathrooms with conventional fixtures
-
Drainage slopes in floors and walls to ensure proper wastewater flow
-
Space near the toilet for cleanouts or future maintenance access
Pump Chambers (if applicable):
In pressure distribution or aerobic systems, you may need a small pump chamber inside or immediately adjacent to the building. This might take the form of:
-
A closet- or utility-room-sized tank with a sealed cover
-
Electrical access for the pump
-
An alarm system or panel to notify you of pump failure or overflow
Most homeowners never interact with this component—once installed, it simply works in the background. But it does take up some space, usually 2–3 square feet and up to 3 feet tall, depending on system capacity.
Graywater Considerations:
If you’re separating graywater (from sinks and showers) from blackwater (from toilets), you may need additional plumbing splits and indoor routing space. This can slightly increase your system’s footprint—especially if you’re diverting graywater for irrigation or reuse.
In most off-grid homes, these features are hidden behind walls and under floors, but they still need proper planning during your build phase.
4. Septic System Space Requirements – Outdoor: By Type
This is where septic systems demand the most room—often much more than newcomers expect. From the tank to the drain field, the outdoor footprint can stretch across a significant portion of your property, and proper placement is critical for performance, safety, and code compliance.
Septic Tank Placement:
The tank itself is usually:
-
4 to 6 feet wide
-
8 to 12 feet long
-
Buried 2 to 4 feet below grade
-
Set 10–20 feet from the house (depending on code and site layout)
While the tank’s surface area isn’t huge, it must remain accessible for pumping. That means:
-
No buildings, decks, or driveways on top
-
Clearly marked access lids for maintenance
-
Adequate space for a pump truck to reach the tank—sometimes requiring a long hose if vehicle access is limited
Drain Field / Leach Field Requirements:
This is where the system gets greedy. A standard gravity-fed drain field typically requires:
-
400–1,200 square feet of open space (sometimes more)
-
At least 100 feet from water sources (wells, streams, ponds)
-
At least 10–25 feet from buildings, gardens, and trees
-
Deep root-free zones to protect pipes from intrusion
The size and design depend on the percolation rate of your soil. Slower-draining clay means larger fields; fast-draining sand means deeper separation from groundwater.
Alternative Systems Space Needs:
Some non-conventional systems require even more careful space planning:
-
Mound systems are built above grade and can span 1,000+ square feet with added height and width for engineered layers of sand and gravel.
-
Aerobic treatment units may reduce drain field size slightly but require space for blower tanks and potential disinfection units.
-
Pressure distribution fields spread effluent more evenly, but still need similar overall square footage and space for electrical components.
Setbacks and Legal Boundaries:
Local health departments usually enforce strict minimum distances (setbacks) between septic components and:
-
Property lines
-
Wells (yours and neighbors’)
-
Surface water
-
Buildings
-
Driveways
That means even if you have the physical space, it might not be legal space. Always do a thorough siting review before breaking ground.
For smaller lots, challenging topography, or tricky soil conditions, the space demands of septic systems can make them functionally or legally unworkable—one of the key reasons many off-grid folks opt for composting toilets instead.
Maintenance Reality: What Each System Demands
Choosing your waste system isn’t just about how it looks on day one—it’s about how it behaves on day 1,000. Maintenance can make or break your long-term satisfaction, and every system has its own rhythm, responsibilities, and potential pitfalls. Let’s explore what each one really asks of you, day to decade.
1. Self-Contained Composting Toilets: Daily Diligence, Compact Control
These little champions are all-in-one marvels—but they do expect you to be part of the team. Their compact size means they fill up faster, so users should plan on:
-
Adding bulking material after each use (sawdust, coir, etc.)
-
Mixing the contents regularly (often with a built-in crank or agitator)
-
Monitoring moisture levels (not too wet, not too dry)
-
Checking for odors and adjusting ventilation if needed
-
Emptying the solids chamber every 2–4 months, depending on use
Most units also include a urine diversion container, which may need emptying every few days to a week. This part is quick, but it’s not automated. If neglected, urine buildup can cause odor, clogs, or overflow.
While the system requires frequent small actions, there’s a lot of user control—and for many off-grid dwellers, that’s part of the appeal. There are no hidden parts, no surprise breakdowns, and no need to call in a pro unless something physically breaks. Just a regular rhythm of stewardship and attention.
2. Split/Central Composting Toilets: Big Volume, Low Frequency
If self-contained systems are the minimalist sprinters of the composting world, split systems are the marathoners. These setups offer higher capacity, more stability, and less frequent maintenance—perfect for full-time families or those who don’t want to think about their toilet every week.
Because the composting chamber is much larger and often better insulated (especially when located in a basement or crawlspace), decomposition tends to be more consistent and forgiving. You’ll generally only need to:
-
Check the chamber moisture and airflow monthly
-
Add bulking material periodically (some systems automate this with gravity-fed hoppers)
-
Stir or rotate the composting mass occasionally, depending on design
-
Remove finished compost once or twice per year
That’s right—yearly emptying is the norm for well-sized central systems. Some are designed to handle multiple toilet inputs, which reduces strain on each unit and simplifies large-home planning.
However, when it’s time to empty the chamber, the job is bulkier. You may be removing dozens of gallons of material and transferring it to an outdoor curing bin. Depending on your system, this can involve:
-
Removing and replacing large access lids
-
Shoveling or scooping semi-composted material
-
Managing leachate collection or drainage tubes
The good news? These systems rarely surprise you. Their slow-and-steady nature makes them reliable workhorses—but only if you respect their scale and stay on top of the seasonal rhythm.
3. Bucket & Batch Systems: The DIYer’s Dance With Discipline
Welcome to the gritty world of the humanure bucket—beloved by off-grid purists, back-to-landers, and the ultra-frugal. It’s as simple as it gets: a 5-gallon bucket, a toilet seat, and a pile of sawdust. But don’t let the simplicity fool you—this system thrives (or fails) entirely on your discipline.
Maintenance here is an everyday affair:
-
Add a generous layer of dry cover material after every use
-
Monitor fill levels (⅔ full is typically the cutoff)
-
Carry full buckets to your outdoor composting bin
-
Clean and sanitize the bucket before reuse
-
Rotate through at least two compost bins outdoors to allow for safe curing
The compost pile itself needs attention too. While decomposition will happen on its own, regular layering, moisture monitoring, and pest-proofing go a long way. And unless you’re using a vermicomposting or hot composting method, you’ll need to wait at least a year before the material is safe to use.
This system demands physical involvement. It’s not “set it and forget it”—it’s “show up and stir the pile.” But for those with a strong DIY ethic, it offers:
-
Near-zero cost
-
Absolute control over the composting process
-
No mechanical failures or electronic components
-
A deeply satisfying closed-loop nutrient cycle
Just know this: if you slack off, it shows fast. Smells, spills, and pest problems aren’t baked into the system—they’re signs the human has dropped the ball.
4. Vermicomposting Toilets: Worms at Work
If composting toilets are a partnership between you and microbes, vermicomposting toilets bring a whole new ally to the team: worms. Specifically, red wigglers (Eisenia fetida)—tiny, tireless workers who eat waste, aerate the pile, and produce castings that are black gold for the soil.
Maintenance in a vermicomposting system is less about mixing and more about creating the perfect worm haven:
-
Maintain temperature between 55–85°F (worms die off in freezing temps or excessive heat)
-
Keep bedding moist but not soggy (like a wrung-out sponge)
-
Ensure a good mix of fresh input (waste) and high-carbon cover material
-
Monitor for any signs of worm stress: escaping worms, foul odors, or anaerobic layers
Most vermicomposting toilet designs don’t need manual stirring because the worms do the mixing themselves—tunneling through the material, creating air channels, and breaking down solids faster than passive systems.
Finished castings accumulate in the lower layers of the bin and can be harvested every 3–6 months depending on the size of the system and the number of users. Just be sure to:
-
Remove castings carefully without disrupting the upper layers
-
Replace bedding as needed
-
Avoid introducing toxic substances (bleach, ammonia, antibiotics) that could wipe out the colony
Worm systems can feel “set it and forget it” once established, but they require careful environmental balance. Treat your worms well, and they’ll reward you with nearly odorless operation, rapid composting, and a nutrient-dense output that rivals anything from a store shelf.
5. Conventional Gravity Systems: Low Tech, Low Maintenance… Until It’s Not
Conventional gravity-fed septic systems are deceptively simple. Flush, forget, repeat—it’s the waste management equivalent of autopilot. And for years at a time, it may seem like nothing ever needs doing.
But under the surface, a quiet process of separation, digestion, and filtration is constantly at work—and your job is to keep it undisturbed.
Here’s what routine maintenance looks like:
-
Pump the tank every 3–7 years, depending on tank size and household usage
-
Limit what goes down the drain—no grease, wipes, chemicals, or excess food scraps
-
Spread out water-heavy activities like laundry and showers to avoid overloading the system
-
Inspect the tank and drain field lids annually for cracks, root intrusion, or signs of backup
-
Monitor vegetation over the drain field—only shallow-rooted plants allowed
When everything is working, there’s little to do. But when something goes wrong—say, sludge overflows into the drain field or a pipe collapses—you’re looking at major disruption. Worst-case scenarios include:
-
Drain field failure, requiring excavation and rebuild
-
Backup into the home, resulting in costly cleanup
-
Contamination of nearby wells or groundwater
-
Fines for environmental violations if your system leaks untreated waste
So while conventional systems earn their “low maintenance” reputation in the short term, they also carry the risk of expensive surprises if neglected. A proactive homeowner checks in once in a while—a reactive one might end up calling an excavator.
6. Pressure Distribution Systems: Even Flow, Added Complexity
Pressure distribution systems are like the precision irrigation systems of the septic world—they don’t just rely on gravity; they dose the drain field evenly with a pump and timing mechanism. The result? Better performance in tricky soils. The trade-off? More moving parts, more upkeep.
Here’s what maintenance looks like:
-
Regular pumping of the septic tank—still every 3–5 years
-
Pump chamber inspections, usually annually, to check for solids accumulation or float malfunction
-
Cleaning the pump filter screen (if present) to prevent clogs
-
Testing the pump and float system to ensure consistent dosing
-
Backup power planning in case of outages—because no pump means no flushing
-
Alarm checks—most systems include a warning light or buzzer that sounds if the pump fails or the tank overfills
The main benefits of this system are even effluent distribution and the ability to place your drain field uphill or on less-than-ideal terrain. But all that flexibility comes at a price:
-
Pumps can fail—especially without regular inspection or in lightning-prone areas
-
Electrical components may corrode over time if not sealed or maintained
-
Timer controls and float switches can drift or get stuck, leading to irregular dosing or overflow
So while pressure systems extend your septic options, they also shift your role from occasional overseer to part-time technician. A few minutes of maintenance each month can prevent thousands in repairs—or a very unpleasant surprise in your yard.
7. Mound Systems: Managing the Mountain You Built
Mound systems are the go-to solution when your soil says “absolutely not” to traditional septic setups—whether it’s too shallow, too wet, too slow-draining, or too close to bedrock. These engineered mini-hills are impressive feats of wastewater redirection… but they come with their own maintenance mountain to climb.
What they ask of you:
-
Annual inspection of the entire system, including the septic tank, pump chamber, and mound
-
Routine septic tank pumping every 3–5 years
-
Monitoring the mound surface for signs of saturation, erosion, or plant overgrowth
-
Keeping the mound clear of deep-rooted vegetation, heavy equipment, and foot traffic
-
Managing stormwater runoff to ensure it doesn’t flood or erode the mound
-
Checking the pump system for proper dosing, pressure distribution, and float alignment
Because mound systems rely heavily on pressure to evenly dose the sand and gravel bed, the pump is a critical component—and if it fails, the whole system can become overwhelmed quickly.
What can go wrong?
-
Surface seepage or wet spots—signs that the mound is oversaturated
-
Cracking or erosion from poor drainage or heavy rain
-
Root intrusion from improperly planted vegetation
-
Pump failure leading to tank overflow or effluent backup
-
Freezing in colder climates if pipes aren’t buried or insulated deep enough
Mound systems work beautifully when respected, but they’re not a “build it and forget it” solution. Think of them more like a raised-bed garden: lovely, functional, but always in need of a little care and observation.
8. Aerobic Treatment Units (ATUs): Small-Scale Wastewater Factories
If a conventional septic tank is a slow stew pot of sludge, an Aerobic Treatment Unit is a bubbling bio-reactor with a work ethic. These systems inject air into the waste stream, supporting aerobic bacteria that break down solids faster and more completely than their anaerobic cousins.
But all that performance comes with responsibility—ATUs are the most maintenance-intensive option on this list.
Here’s what’s on your to-do list:
-
Quarterly or biannual inspections by a licensed technician (required by many state codes)
-
Pumping every 2–5 years, depending on use and system size
-
Monthly visual checks of spray heads, air compressors, alarms, and effluent clarity
-
Cleaning or replacing air filters in the compressor to maintain airflow
-
Monitoring chlorination or UV disinfection systems, where included
-
Replacing worn-out diaphragms or diffusers every few years (varies by model)
These systems often come with:
-
Alarm panels to alert you to aerator or pump failure
-
Sampling ports for effluent quality testing
-
Service contracts, which some municipalities require as a condition of use
The upside? Crystal-clear effluent and the ability to build on sites that would otherwise be off-limits due to poor soil, high water tables, or proximity to waterways.
The downside?
-
Electricity dependency—no power = no treatment
-
Higher upfront and ongoing costs (units alone can run $7,000+, not including install)
-
Fussy components that don’t tolerate neglect
-
Legal oversight in many areas, which may require reporting or inspection logs
In short, ATUs are wastewater powerhouses—but they’re not for the set-it-and-forget-it crowd. They're best for homeowners who want high performance and are okay with treating their waste system like a mini utility plant.
9. What Can Go Wrong (and Can You Fix It Yourself?)
Every system seems like a dream… until something goes wrong. Whether you’re composting your own contributions or trusting them to a buried tank and a prayer, problems will pop up eventually. The question is: can you handle them yourself, or will you need to call in reinforcements?
Let’s break it down:
Composting Toilets – DIY Friendly
Common issues:
-
Too wet? Add more bulking material and improve ventilation
-
Too dry? Mist lightly with water to rehydrate microbes
-
Smelly? Check your vent fan, reseal gaps, and remix the chamber
-
Slow breakdown? Add microbial inoculants or adjust the C:N ratio
Fix-it factor:
Almost everything is user-fixable. With basic tools and a little composting savvy, you can troubleshoot and repair nearly any issue in a few hours—no professionals required. Worst case? Empty the chamber and start fresh.
Septic Systems – Call the Pros (Mostly)
Common issues:
-
Backups into the home (usually from a full tank or clogged outlet)
-
Drain field saturation or failure
-
Leaking tanks or broken baffles
-
Pump failure in pressure or aerobic systems
-
Alarm triggers or overflowing pump chambers
Fix-it factor:
Most internal septic issues are not DIY territory. Digging up tanks or drain fields without proper equipment risks damage, contamination, and legal trouble. You can:
-
Check the tank level with a probe
-
Silence an alarm and inspect breakers
-
Clean a pump filter or float
-
Reduce system load temporarily
But for full repairs, pumping, or serious malfunctions, you're calling a licensed technician—and likely opening your wallet.
Final Thought: Risk vs. Responsibility
If you’re the type who wants control, flexibility, and fix-it-yourself freedom, composting systems reward that mindset. But if you prefer the invisible magic of plumbing that “just works,” septic systems can deliver—until they don't.
Both paths demand responsibility. The question is whether you’d rather scoop compost on a schedule or pay for a backhoe when the drain field goes rogue.
Environmental Benefits of Composting Toilets
Composting toilets don’t just manage waste—they actively regenerate the land, reduce strain on water systems, and help close ecological loops. While septic systems hide the problem underground, composting systems bring the solution full circle—turning waste into wisdom with every bucket or bin.
1. Water Conservation Impact: Saving the World's Most Precious Resource
Flushing toilets are the single largest indoor use of water in most households, accounting for nearly 30% of total indoor consumption. Each flush sends 1.6 to 5 gallons of clean, potable water—treated to drinking standards—down the drain.
By contrast, composting toilets use zero water. That’s a savings of:
-
~6,000 gallons per person per year (conservatively)
-
~24,000 gallons/year for a family of four
-
A massive relief for systems using rainwater catchment, hand-pumped wells, or solar-powered water pumps
In regions where every drop counts—like drought-prone climates, remote off-grid builds, or shallow-well properties—these savings are not just environmental; they’re operational survival. Less water needed for flushing means smaller tanks, fewer pumping cycles, and longer storage capacity between rainfall events.
Water that isn’t wasted on waste becomes available for:
-
Irrigation
-
Animal care
-
Hygiene and cleaning
-
Food processing
This shift is especially crucial for off-grid systems, where power and water are both tightly managed resources.
2. Elimination of Nutrient Runoff: Protecting Waterways & Ecosystems
Septic systems, even in ideal conditions, leach nitrogen and phosphorus into the soil. When they fail—or when soil conditions aren't perfect—those nutrients escape into groundwater, streams, or lakes.
This causes:
-
Algal blooms that smother aquatic ecosystems
-
Oxygen-depleted "dead zones" in lakes and coastal waters
-
Harm to fish and wildlife, including drinking water contamination for livestock
-
Human health risks in private wells (especially from nitrate leaching)
Composting toilets cut this cycle off at the root:
-
No effluent is discharged—everything stays contained
-
Nitrogen is stabilized in organic form through aerobic decomposition
-
Phosphorus remains bound in the compost matrix, rather than becoming water-soluble runoff
-
Nutrients are returned to the soil intentionally, at the right time, in the right place, and in the right form
This makes composting toilets a vital ally for watershed protection, regenerative farming, and climate-smart water stewardship.
3. Soil Health Improvement Through Compost: Building Living Systems
What comes out of a well-managed composting toilet isn’t waste—it’s a soil-building resource. Over time, the finished compost (after curing for a year or more) becomes:
-
Rich in humus, improving soil structure and texture
-
A reservoir of slow-release nitrogen, phosphorus, potassium, and trace minerals
-
A boost to soil microbial activity, increasing nutrient cycling and pathogen suppression
-
A buffer that helps soils retain water in drought and drain faster during heavy rains
-
A vehicle for carbon sequestration, locking organic matter into the ground instead of releasing it as methane
Unlike chemical fertilizers, which can burn roots or leach into groundwater, compost from dry toilets supports the soil food web—feeding bacteria, fungi, worms, and plant roots alike.
And here's the full-circle win: the better your soil, the better your garden or food forest. You’re literally turning your own outputs into inputs for abundance.
4. Reduced Carbon Footprint: Low-Tech, High-Impact
Let’s talk carbon. Composting toilets avoid greenhouse gas emissions on multiple fronts:
Infrastructure
-
No need for concrete septic tanks, whose cement production is a major source of industrial CO₂
-
No excavation or drain field installation = no diesel emissions from backhoes and dump trucks
-
Lightweight units ship with a fraction of the footprint compared to hauling septic components
Operation
-
No water pumping = less energy use, especially in solar-powered or gravity-fed systems
-
No municipal sewage processing = no downstream emissions
-
No methane from anaerobic digestion, which is 25x more potent than CO₂ as a greenhouse gas
Resource Circularity
-
Finished compost replaces synthetic fertilizers, whose production is energy-intensive and fossil-fuel based
-
Composting locks carbon into the soil, turning it from a gas into a solid
-
Every flush avoided is another gallon of water that didn’t require chlorination, pressurization, and transport
Taken as a whole, composting toilets are one of the easiest and most effective tools for homesteaders to reduce their environmental impact—without sacrificing function, comfort, or hygiene.
Environmental Impacts of Septic Systems
While septic systems may seem invisible once installed, their long-term ecological footprint can be substantial—especially when systems are outdated, improperly maintained, or placed in unsuitable environments. From leaching nutrients into groundwater to adding carbon emissions via concrete and machinery, the full picture is more complex than it appears at flush level.
1. Nutrient Leaching: How Septic Systems Contribute to Water Pollution
At the heart of the issue is one simple truth: septic systems are not nutrient recycling systems—they’re nutrient disposal systems. And when the soil can’t keep up, those nutrients escape.
Here’s how it happens:
-
Nitrogen and phosphorus, especially from urine, pass through the septic tank largely unchanged
-
Once in the drain field, they rely on soil microbes and filtration to be neutralized
-
But if the soil is too sandy (drains too fast) or too compacted (drains too slow), the filtration fails
-
Nitrate (NO₃⁻) in particular is highly mobile and readily leaches into groundwater
-
Phosphorus binds to soil particles but can build up over time, especially in older systems
The result?
-
Contaminated drinking water wells, especially in rural communities
-
Harmful algal blooms in lakes, rivers, and estuaries fed by nutrient-rich runoff
-
Creation of dead zones in coastal waters from oxygen-depleting decomposition
-
Increased risk of blue baby syndrome (methemoglobinemia) in infants exposed to high nitrate levels
Even well-designed systems aren’t immune. Studies have shown that traditional septic systems often remove less than 50% of nitrogen, especially in areas with seasonal saturation or shallow water tables.
Composting toilets avoid this issue entirely by capturing nutrients in a stable, usable form. When managed properly, composting closes the loop, rather than flushing it downstream.
2. Soil Saturation & Drain Field Failures: When the Earth Can’t Keep Up
A septic system is only as good as the soil beneath it—and when that soil gets saturated, compacted, or biologically overwhelmed, the entire system begins to back up… literally.
Here’s how it unfolds:
The Chain Reaction of Overload
-
Effluent leaves the septic tank and enters the drain field, where it’s supposed to slowly trickle into the soil
-
If the soil is already saturated from rain, poor drainage, or a high water table, it can’t absorb more
-
The effluent begins to pool, stagnate, and rise to the surface—or worse, backflow toward the house
-
Over time, a slimy, black layer known as “biomat” forms around the pipes, clogging them and further slowing absorption
-
Eventually, the system clogs completely and fails, often requiring a full drain field replacement
Warning Signs of Saturation Trouble
-
Soggy or marshy patches above the drain field
-
Sewage odors outdoors or near plumbing vents
-
Toilets and drains backing up or gurgling
-
Lush, bright green grass growing over the drain field (yes, it's getting "fertilized")
-
Slow drainage that seems to worsen after storms or heavy water use
The Real Cost of Ignoring It
Drain field repairs aren’t minor. Excavating and replacing a failed field can cost anywhere from $5,000 to $20,000+, and that’s assuming your property even has the space or soil conditions for a replacement. In some cases, homeowners are forced to upgrade to mound systems or ATUs, further increasing the cost.
Septic failure also poses serious health and environmental hazards, allowing untreated or partially treated waste to contaminate surface water and nearby wells.
By contrast, composting toilets remove this risk entirely—no effluent, no biomat, no soggy yard, and no secret wastewater swamp hiding beneath your lawn.
3. Impact on Aquifers & Drinking Water Safety
Septic systems are designed to treat wastewater on-site—but “treatment” doesn’t always mean “containment.” In many rural and off-grid areas, septic systems and drinking water wells coexist on the same property, often separated by nothing more than a few dozen yards of soil.
And when that soil underperforms? Your drinking water becomes part of the waste stream.
How It Happens
-
Septic tanks discharge effluent into the ground through perforated drain field pipes
-
The liquid travels downward—ideally through a biologically active soil layer that filters out contaminants
-
But nitrates, pharmaceuticals, hormones, viruses, and bacteria can slip through
-
In areas with shallow aquifers, fractured bedrock, or sandy soils, contaminants can travel long distances underground
-
Private wells, especially older or hand-dug ones, may not be deep enough or sealed tightly enough to avoid contamination
Real Risks Include:
-
E. coli, Giardia, Cryptosporidium – pathogens that cause gastrointestinal illness
-
Nitrate poisoning – especially dangerous to infants, causing oxygen-starvation in the blood
-
Endocrine-disrupting chemicals – from medications, cleaning agents, and personal care products
-
Chronic low-dose exposure to antibiotic-resistant bacteria and synthetic compounds
Many homeowners don’t realize they’re vulnerable until they test their well—and the results aren’t always good. Septic-related contamination is one of the leading causes of private well pollution in the U.S., particularly in rural and unregulated areas.
How Composting Toilets Bypass the Problem
-
No liquid effluent enters the soil
-
Urine is contained, treated, or repurposed
-
Solid waste is safely composted above ground
-
Zero risk of leaching into groundwater
-
Nutrients stay in the loop, not in your drinking glass
So while septic systems send waste away, composting toilets keep it where it can be safely managed and turned into something useful—without putting your aquifer on the line.
4. Energy, Materials & Carbon Footprint of Septic Infrastructure
Septic systems might seem like passive, “natural” solutions once they’re in the ground—but getting them there, and keeping them running, carries a hidden environmental cost that composting systems simply don’t share.
Let’s break it down:
Materials & Construction Impact
-
Concrete septic tanks require a massive amount of cement—a material responsible for roughly 8% of global CO₂ emissions
-
Heavy machinery (excavators, dump trucks, backhoes) are used to dig pits, trenches, and move large tanks
-
Gravel and pipe for drain fields must be mined, transported, and distributed—often across large distances
-
Installation often involves multiple site visits from trucks and contractors, increasing diesel emissions and compaction of topsoil
Even a basic gravity-fed septic system has a multi-ton carbon footprint before it ever sees a single flush.
Energy Use & Lifecycle Emissions
While gravity systems don’t require electricity, modern alternatives often do:
-
Pumps and compressors in pressure and aerobic systems consume power 24/7
-
Blowers and UV lights in ATUs add to the load
-
Backup power systems may be required in off-grid applications—often increasing solar array size or necessitating a generator
Then there’s ongoing maintenance:
-
Pump-out trucks travel miles to remote sites to remove sludge
-
That sludge is then transported to municipal treatment plants, sometimes across county lines
-
Sludge is often chemically stabilized or incinerated, both of which have their own emissions profile
By contrast, composting toilets:
-
Require no excavation or cement
-
Use little to no electricity (a 3-watt fan is common)
-
Avoid pump-outs, truck traffic, and hauling
-
Recycle nutrients on-site rather than exporting them
-
Turn waste into carbon-sequestering compost instead of methane-emitting sludge
Net Carbon Perspective
Over its lifetime, a composting toilet system can actively reduce your homestead’s carbon footprint by:
-
Avoiding water pumping and treatment infrastructure
-
Reducing demand for synthetic fertilizers
-
Returning carbon to the soil (a form of passive sequestration)
Septic systems, in contrast, often behave more like carbon liabilities—resource-intensive to install, fossil-fuel-reliant to maintain, and structurally unable to recover the nutrients or energy value of the waste they process.
Making Your Decision: Which System Matches Your Homestead Needs
The right waste management solution for your off-grid homestead depends on balancing multiple factors. Consider these questions as you decide:
- Water Availability: Is water scarce or plentiful on your property?
- Soil Conditions: Has a perc test been done? What are your soil limitations?
- Regulatory Environment: What do local codes allow or require?
- Budget: What can you afford initially and long-term?
- Maintenance Preferences: Are you comfortable handling compost?
- Family Size: How many people will regularly use the system?
- Future Plans: Might you sell the property? Will family size change?
- Environmental Values: How important are water conservation and nutrient recycling?
Many off-grid homesteaders find that composting toilets align perfectly with their self-sufficiency goals, environmental values, and practical needs. The combination of lower costs, simpler installation, water conservation, and nutrient recycling makes a compelling case for composting systems, especially on challenging sites.
However, septic systems remain the right choice for those who prefer conventional bathroom facilities and have suitable land conditions. Their main advantages are familiarity, regulatory acceptance, and hands-off operation.
Whichever system you choose, proper installation and maintenance are essential to ensure it functions correctly, protects the environment, and serves your homestead for years to come.
For those looking to create truly sustainable off-grid homes with regenerative waste management systems, UpRooted Greens offers additional resources and guidance on creating closed-loop ecological systems for holistic homesteading.
Common Mistakes When Choosing a Waste System (and How to Avoid Them)
It’s one thing to compare specs, costs, and carbon footprints. It’s another to make a decision that turns into a nightmare because you overlooked a key factor. Let’s walk through the most common mistakes homesteaders make when choosing between composting toilets and septic systems—so you can steer clear and stay sane.
Mistake #1: Assuming What Works in Town Will Work Off-Grid
Many people new to off-grid living default to septic because “that’s what houses have.” But septic systems depend on:
-
Plentiful water supply
-
Suitable soil for a drain field
-
Access for excavation and pumping equipment
-
Electricity for advanced systems
If you're on a tight water budget or your property has shallow bedrock or high water tables, a septic system could be more burden than solution. Always test your soil (perc test) and assess your water situation before committing.
Mistake #2: Ignoring Local Regulations Until It’s Too Late
You can’t just build whatever you want—at least not without checking first. Some jurisdictions require a permitted septic system regardless of your off-grid dreams. Others may allow composting toilets only if they meet NSF/ANSI Standard 41 or are backed by engineered graywater systems.
Solution:
-
Call your local health department before purchasing anything
-
Ask about approved systems and any exemptions for off-grid or seasonal dwellings
-
Be ready to educate officials—they may not be familiar with modern composting technologies
Mistake #3: Overestimating Your Tolerance for Maintenance
Let’s be honest—composting toilets are not “hands-off.” If you’re not comfortable seeing and handling your own waste, the idea of emptying a solids bin or managing a worm bin may wear thin fast.
Solution:
-
Choose a system that matches your personality and lifestyle
-
Be realistic about daily, weekly, and yearly routines
-
Opt for central composting or hybrid setups if you want low frequency but don’t mind an annual chore
Mistake #4: Underestimating Long-Term Costs of Septic Systems
Sure, composting toilets may seem more work upfront, but septic systems can be sneaky money pits over time. Pump-outs, part failures, drain field replacements—all add up. And if your system fails due to overuse or bad siting? It’s not just expensive. It can become unlivable.
Solution:
-
Look at total lifecycle costs, not just the install price
-
Ask neighbors about maintenance schedules and repair histories
-
Factor in access issues for pumping trucks, especially in winter or remote areas
Mistake #5: Designing the House Before the Waste System
Too often, people plan their bathroom layout, deck, or foundation before thinking about where the tank or compost chamber will go. This can lead to awkward retrofits, impossible drop chutes, or even code violations.
Solution:
-
Design your bathroom, utility space, and foundation layout around your waste system—not the other way around
-
Leave clear access paths for maintenance, venting, and equipment
Bottom line? A little planning goes a long way. Think of your waste system as a cohabitant, not an afterthought—and choose the one that fits your land, your lifestyle, and your long-term goals.
3. When Hybrid Solutions Make Sense
Sometimes, the best answer isn’t choosing between a composting toilet or a septic system—it’s blending the two. Hybrid setups allow you to match different waste strategies to different parts of your life, your home, or your land. Done well, a hybrid system offers the best of both worlds: resilience, regulatory flexibility, and long-term adaptability.
Common Hybrid Scenarios
Composting Toilet + Graywater Leach Field
This is one of the most popular off-grid combos. Human waste is handled by a composting toilet, while graywater (from sinks, showers, and laundry) is routed to a simple leach field or constructed wetland.
-
Great for low-water households
-
Often avoids the need for a full septic permit
-
Allows nutrient recycling from compost while safely dispersing used water
Septic System + Outhouse or Backup Compost Toilet
Many full-time homesteaders install a septic system for convenience—but also keep a dry toilet or composting setup for:
-
Power outages
-
Guests and outdoor events
-
Emergency situations
-
Remote outbuildings, greenhouses, or workshops
Having a non-electric alternative ensures the toilet still works when the grid (or your pump) doesn’t.
Bucket or Batch System + Vermicompost Backup
Some off-gridders alternate between batch-style buckets and a dedicated worm composting system. The bucket gets emptied into the worm bin, which does the heavy lifting of decomposition—essentially turning your whole property into a nutrient recovery facility.
Why Go Hybrid?
-
Redundancy: If one system fails, the other can take over temporarily
-
Seasonal Flexibility: Compost in summer, switch to septic or holding tank in frozen months
-
Cost Distribution: Build part of the system now, expand or upgrade later
-
Code Compliance: Use a legal septic system on paper, but lean on composting for day-to-day use
-
Livability: Give composting a try without fully committing—or provide options for guests
A Word of Caution
Mixing systems does require careful planning—especially when it comes to:
-
Regulations: Your local code may still require full septic even if you plan to use composting most of the time
-
Maintenance: Now you’re managing two systems, not one
-
Clarity: Make sure household members and guests know what goes where (and what doesn’t!)
When done right, hybrid setups can offer maximum flexibility with minimal compromise—an ideal path for evolving homesteads or transitional phases from city to country life.
4. Long-Term Flexibility: What If Your Needs Change?
No matter how carefully you plan your homestead, one thing is certain: your life will change. Maybe your family grows. Maybe aging relatives move in. Maybe you open a guest cabin, start hosting workshops, or install an off-grid rental. Your waste system needs to be able to grow—or pivot—with you.
Composting Systems: Modular, Movable, and Adaptable
One of the biggest advantages of composting systems is how easily they can evolve:
-
Need more capacity? Add a second chamber, rotate through more bins, or install a higher-capacity central unit.
-
Building outbuildings or cabins? Place self-contained units in each structure without trenching or plumbing.
-
Not sure where the bathroom will go? Start with a bucket or mobile unit—then move it when your plans solidify.
-
Upgrading over time? Start with a DIY batch system and move up to a professional split system when the budget allows.
Composting systems are excellent for staged builds—where you start small and expand as your land, income, or homestead grows.
Septic Systems: Stable, But Inflexible
Once a septic system is in the ground, it’s… there. Permanently. That means:
-
Changing the layout of your house? The system might need re-engineering.
-
Adding another building? You’ll likely need a second tank or extensive plumbing upgrades.
-
Soil conditions change over time—especially with climate shifts, flooding, or compaction—your drain field might no longer work properly.
-
Regulations tighten? Your old system might get grandfathered out of compliance, requiring expensive retrofits.
That said, if you plan carefully and build for the maximum projected use case from the beginning, a septic system can serve a growing family for decades.
Hybrid and Parallel Paths for the Win
Some of the most successful homesteads take a layered approach:
-
Start with composting to get up and running without the red tape
-
Add a graywater system or wetland over time
-
Install septic later when finances or legalities allow
-
Or run both, giving yourself permanent redundancy and resilience
The goal is long-term livability, not just short-term convenience. Waste systems are hard to change—but easy to regret if chosen poorly.
Design for your now, but build with an eye toward your future. The best waste system is the one that grows with you.
Frequently Asked Questions: Composting Toilets vs Septic Systems
Q: Are composting toilets legal where I live?
A: That depends on your local health codes. Some counties explicitly allow composting toilets (especially if they’re NSF/ANSI 41 certified), while others require a septic system no matter what. Always check with your local health department before buying or installing any system. That said, composting toilets are often used legally in accessory buildings, remote cabins, and as secondary systems—even in stricter zones.
Q: Do composting toilets smell bad?
A: Not if they’re working properly. In fact, a well-maintained composting toilet smells less than a conventional bathroom. The key is good airflow, dry bulking material, and proper moisture balance. Odors are usually a sign something’s out of balance—and they’re almost always fixable.
Q: Can I use composted human waste in my garden?
A: That’s a debated topic. Technically, yes—but most experts (and regulators) advise using humanure compost only on non-edible crops: trees, shrubs, ornamentals, or pasture. If fully aged and thermally composted for over a year, many off-gridders do use it on fruit trees or perennials, avoiding direct contact with edible parts.
Q: Can I build my own composting toilet?
A: Absolutely. DIY “bucket-and-bin” systems are cost-effective and widely used. Just be sure to follow best practices: use high-carbon bulking material, maintain aerobic conditions, and cure the compost for at least a year before applying it to soil. A vermin-proof outdoor bin is a must.
Q: What happens to the urine?
A: In urine-diverting systems, urine is usually collected separately. It can be:
-
Diluted (at least 8:1 with water) and used as fertilizer
-
Added to compost piles as a nitrogen source
-
Discharged into a graywater system
-
Collected in containers for disposal
Q: What about guests or kids—will they know how to use a composting toilet?
A: With a quick explanation and good signage? Yes. Most self-contained units are intuitive once you explain the bulking material routine. For total ease with guests, some homesteaders keep a backup flush toilet hooked up to a holding tank or graywater-safe drain for big events.
Q: Can a septic system ever be sustainable?
A: It depends on your definition. Septic systems don’t recycle nutrients, require large amounts of water, and can impact local ecosystems—but with proper siting, maintenance, and minimal waste input, they can operate responsibly. Composting toilets, on the other hand, actively contribute to nutrient cycling and water conservation.
🌿 Final Thoughts: Your Waste, Your Wisdom
Building an off-grid homestead isn’t just about installing systems—it’s about making choices that reflect your values, your land, and your lifestyle. Choosing between a composting toilet and a septic system may seem like a technical decision, but it’s also a statement:
-
Will you treat your waste as a burden… or a resource?
-
Will you send nutrients away… or close the loop on your land?
-
Will your system be static… or flexible enough to grow with you?
There’s no one-size-fits-all solution. That’s why this article exists—to give you the full picture, not just a sales pitch.
At UpRooted Greens, we believe sustainability starts at home. And sometimes, it starts with a humble toilet.
Need help planning your off-grid waste system or designing a sustainable homestead that actually works? We’re here for that.
📩 Reach out anytime at [email protected]
🔧 Or book a custom consultation at www.UpRootedGreens.com/book-a-call
You don’t have to do it alone—just off-grid.